

Man, I need a nap.
Silly me forgot to take a picture of the finished blanket, so I'll have to show you all that later, but I did make sure to photograph the cakes, thank goodness!
First up is the actual cake.
The baby's room is decorated in the "Play Ball" theme from Kids Line.

Photo credit: Toys R Us.com.
It started well enough. 
Crumb coated, laptop and graph paper standing by. Corners done, and color matching pretty well.
 Hands a little stained, but doing good.
 And then, according to my husband, the mumbling started.
I ended up lifting off and re-doing the lightest blue when it turned teal, and then for the life of me I could not get the middle blue to match. Granted, it is a blue present in the rest of the layette, it was not the right blue. It did not match the blue in the rug. The camera sat forgotten in the hurricane of Wilton Gels and piping bags, so there are no pictures of what followed.
This is the end result:
 It got raves, but I am still reserved.
That dang blue! Ugh!
Tell me again why the perfectionist crafts?
Moving on!
The Diaper Cake:  SO much happier with this end result! So, for the interested, a diaper cake tutorial.
Google "diaper cake." This was all I needed to do, trust me.
Supplies used:
1 Jumbo package of Pampers Swaddlers
Elastics
2 rolls of wired ribbon
1 roll of satin ribbon
Double stick tape
Glue gun
Chop sticks
Doily - 10 "
Cake round 10"
Begin by distracting your curious toddler with $2.99 worth of Mylar and helium. Technically $5.98, as he managed to get the first balloon untied from his wrist in the parking lot of IParty and we had to go back for another... It was double knotted. Thank you, Baby Houdini!
Roll the entire package of diapers. Secure each with an elastic. Tape would work as well, but if the diapers have any chance of being used in the future, a temporary method of securing is important.
On a 10 inch cake round, or a piece of cardboard cut to size, begin with 5 or 6 diapers with a larger elastic around them all and start to form the bottom layer. I added and tinkered until they filled the circle. Create a "grid" of double stick tape on the base. I added a doily to spiff the cake board. Repeat with the rest of the diapers three tiered layers are formed, with tape between all.
Fearing the tape would not hold, I reached back to making tiered cakes and used chopsticks to brace the layers. Wiggling them between the diapers, four between the bottom and middle and two between the middle and top.
 I tested the first layer of ribbon and realized that the elastics were visible, so I removed the outer elastics and replaced them with double stick tape.
 Using the large elastic to hold the diapers in place while I removed the outer elastics.
 After measuring the ribbon, wide wired and a smaller white accent ribbon, fold and glue the ends to prevent fraying...
 Add a line of glue to hold the accent to the base ribbon...
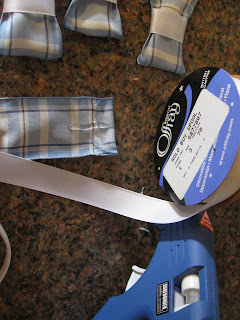 And lay the ribbon over the double stick tape, securing it to itself with glue gun.
 For the bows, cut three equal lengths of wide ribbon...
 Bunch the ends and glue them together...
 Then wrap and glue the white accent ribbon around them.
 Slightly smaller than the width of the ribbon to make a "bow" shape.
Glue the bows to the seams of the ribbons to cover them.
With the remaining wired ribbon, make a wrapped loop of ribbon and cut a length of ribbon for the "legs" of the bow. Knot legs around the loop and fluff the sides of the bow out.
 Use double stick tape to secure the bow to the top of the cake. I added the white accent ribbon to hide the knot and lined it with tape as well to hold it to the sides of the individual diaper it was sitting on.
Curl the legs of the ribbon and trim.
Now you see why I need a nap!


Look at you!! Party planner extraordinare! I love the cake. Awesome job:-)
ReplyDeleteGood gracious, you're one talented chick!!
ReplyDeleteWow! Cake lady!! Nice work on both! (Now I need to go look for a spoon and that tub of frosting in the pantry...)
ReplyDeletethose look great! now i seriously need some cake...
ReplyDeletethanks for visiting my blog via BATW!
I love the cake! It looks very professional, like you are a pro!
ReplyDeleteWow, AWESOME! I love the real cake and the diaper cake. I'll be the blanket was cool too. Thanks for the tutorials too. Geesh, now I need to find someone who needs a baby shower. BAHAHAHAH
ReplyDeleteWow! Now, that was a lot of work! I'm tired just from the blog post! Whew!
ReplyDelete