Showing posts with label In the kitchen. Show all posts

30 January 2009

Frosted Friday: Sugar Loaded Toddler Edition

So I finally decided what to do with this:I made these:
I altered the topping, omitting the cream cheese icing all together.

Instead I melted about two tablespoons of butter and mixed it with 1 teaspoon of vanilla, 2 cups of powdered sugar,and just enough water to make it spreadable.

They were just as yummy as you think they would be.As evidenced by the speed at which they were consumed.
Even Monkey approved.

The photo is a little blurry because he didn't want to sit still, but in his defense I had just loaded him up with a huge cinnamon roll.

And then I settled him in with Hubby and high-tailed it out of there for the afternoon.

In my defense, the sugar crash synchronized perfectly with nap time.

16 January 2009

Frosted Friday Now With More Red Fingers!

Last weekend was our Christmas 2 with Hubby's family. Ab-fab local Sis-In-Law made an amazing dinner with all the trimmings, so I offered to make dessert.

When you're a Northerner with in-laws coming in from South Carolina and Georgia, what else do you make for dessert but Red Velvet Cake?

My southern Sis-In-Law was actually present for the baking, and had the red stained fingers to prove it!

I used the cake and cream cheese frosting recipes I found at Pinch My Salt.

Thank you Google Blog Search!

(Hers looks waaaaaay better than mine, though!)

This is the paste you're supposed to make with the cocoa powder and food coloring. An ounce of food coloring.I actually used a gel, and I don't think I'll do that again. It looks more like joint compound than paste.

I didn't get an action shot of the baking soda and vinegar, as I was afraid I would delay the folding too much. So this is the only action shot.

Can you feel the heat? No?

Cooling and looking pretty good.
Frosted and ready to go.
I think it looks slightly pink.
And what was even coloring when poured in to the pans ended up slightly uneven.
I blame the gel. In retrospect, I should have used a liquid food coloring.

It was met with resounding approval from all Southerners present.

Not bad for a Yankee.

I just have one question...
What am I supposed to do with all of this?

08 January 2009

We Interrupt This Thursday To Bring You Frosted Friday

Between the car stuff and getting ready for Christmas 2, I am all turned around this week!

So tomorrow's post became today's instead. Think of it as a preview of your weekend.

Chocolate Chip Cookies.

Straight up Nestle Tollhouse. Or Nestle Tollouse for you Friends fans.

Classic Peanut Butter.Thank you, Skippy.

And Iced Gingerbread. Which you will notice are almost identical to these, except that I ran out of Vanilla after the first two, and substituted cinnamon sugar in the glaze.

Yay for yummy mistakes!

It is, after all, how we were blessed with fudge!

15 October 2008

Nuh-UH!

I am stunned. Shocked. Speechless.

Peeps, speechless does not happen around here very often.

I am wading through all of your wonderful comments and I promise I will get to you all. Don't forget, the comments are open until midnight EST on Thursday, and I will draw a random winner on Friday.

I wish I could send you all something spiffy from MA, so...

How about a brownie? A brownie recipe maybe?

My Grasshopper Brownie recipe, now with new and improved whipped ganache, courtesy of Lauren!

A few years ago, a mom of a friend of my sis-in-law made a minty brownie concoction that my husband fell in love with. When he asked her what was in it, it included Creme de Menthe, and a bunch of stuff he didn't quite catch. He's not a baker, and we don't exactly stock Creme de Menthe, so - enter my ninja kitchen skills. The end result? Grasshopper Brownies.

Start by preparing your favorite brownie recipe. I have made them from scratch, but I'm still tweaking that one, so boxed it is.

I use the largest pan I have, 11x9. It makes the brownies thinner to begin with, but remember, they're getting two yummy layers of frosted goodness, so thin is good.

Using either a Silpat or parchment paper, do this:
Weird, I know, but trust me. Rather, trust Alton Brown, my guru of all things edible. This step is key to the easiest de-panning you will ever do. I also use a little baking spray on the ends not covered by the Silpat. Do not try to sub in wax paper, or you will end up with crayon flavored brownies.

I am the voice of experience on this one.

Fill 'er up, and bake as directed. Remember, it's thinner, so adjust accordingly!
Once the brownies are cooled, heat 1/2 cup heavy cream. I do this in the microwave on high for about 30 seconds . When warm, add 12 ounces of semi-sweet chips.
Stir...
Stir... You may need to put it back in the microwave, but only do so for 10 seconds at a time. Burnt chocolate is not yummy.

Keep stirring!
When it looks like this:
Stop stirring and park it in the fridge.

In a mixer, or mixing bowl with hand held beaters combine the following:

3 cups powdered sugar
1/3 cup water
1 tablespoon butter, melted
Green food coloring
2 tablespoons peppermint extract
(You can add more or less, but take it easy or you will be exuding minty freshness for days!)
Whip until it is the consistency of frosting. This may require adding a little more powdered sugar or water until it's just right.

Use a light touch.
Plop - technical term of course - on top of the cooled brownies.
And spread with an offset spatula, if possible.
Dipping the spatula in warm water will help keep the frosting from sticking and will spread it more evenly.

Your ganache should be cool, and starting to chill and almost become firm around the edges.

Time to whip it!

Action shot!
It will become lighter as you whip in more air.

Scrape your bowl...
And plop again.
Spread again, and return to fridge to firm up.
Pause to lick spatula.
Then clean up the mess you made while whipping.
When the ganache is firm, run a small knife around just the ends of the pan where the Silpat does not reach.
I couldn't photograph the next step, but grab the edges of the Silpat and wiggle just slightly.

Lift and...

TA-DA!
Easiest de-panning ever!

Slice...
And serve with milk. Or coffee. Or actual Creme de Menthe if that's your thing.
What wine goes with chocolate minty yumminess?

Enjoy!

06 October 2008

Baby Shower Crafts And A Tutorial

I feel like I've just finished a baby shower triathlon. Blanket, diaper cake, and cake all done and delivered.

Man, I need a nap.

Silly me forgot to take a picture of the finished blanket, so I'll have to show you all that later, but I did make sure to photograph the cakes, thank goodness!

First up is the actual cake.

The baby's room is decorated in the "Play Ball" theme from Kids Line.


Photo credit: Toys R Us.com.

It started well enough.
Crumb coated, laptop and graph paper standing by. Corners done, and color matching pretty well.
Hands a little stained, but doing good.
And then, according to my husband, the mumbling started.

Blue mumbling, full of blue language and about blue food coloring.

I ended up lifting off and re-doing the lightest blue when it turned teal, and then for the life of me I could not get the middle blue to match. Granted, it is a blue present in the rest of the layette, it was not the right blue. It did not match the blue in the rug. The camera sat forgotten in the hurricane of Wilton Gels and piping bags, so there are no pictures of what followed.

This is the end result:It got raves, but I am still reserved.

That dang blue! Ugh!

Tell me again why the perfectionist crafts?

Moving on!


The Diaper Cake: SO much happier with this end result! So, for the interested, a diaper cake tutorial.

Google "diaper cake." This was all I needed to do, trust me.

Supplies used:

1 Jumbo package of Pampers Swaddlers

Elastics

2 rolls of wired ribbon

1 roll of satin ribbon

Double stick tape

Glue gun

Chop sticks

Doily - 10 "

Cake round 10"


Begin by distracting your curious toddler with $2.99 worth of Mylar and helium.Technically $5.98, as he managed to get the first balloon untied from his wrist in the parking lot of IParty and we had to go back for another... It was double knotted. Thank you, Baby Houdini!

Roll the entire package of diapers. Secure each with an elastic. Tape would work as well, but if the diapers have any chance of being used in the future, a temporary method of securing is important.

On a 10 inch cake round, or a piece of cardboard cut to size, begin with 5 or 6 diapers with a larger elastic around them all and start to form the bottom layer. I added and tinkered until they filled the circle. Create a "grid" of double stick tape on the base. I added a doily to spiff the cake board. Repeat with the rest of the diapers three tiered layers are formed, with tape between all.

Fearing the tape would not hold, I reached back to making tiered cakes and used chopsticks to brace the layers.
Wiggling them between the diapers, four between the bottom and middle and two between the middle and top.
I tested the first layer of ribbon and realized that the elastics were visible, so I removed the outer elastics and replaced them with double stick tape.
Using the large elastic to hold the diapers in place while I removed the outer elastics.
After measuring the ribbon, wide wired and a smaller white accent ribbon, fold and glue the ends to prevent fraying...Add a line of glue to hold the accent to the base ribbon...
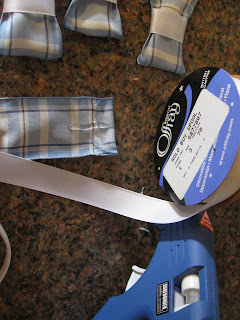
And lay the ribbon over the double stick tape, securing it to itself with glue gun.
For the bows, cut three equal lengths of wide ribbon...
Bunch the ends and glue them together...
Then wrap and glue the white accent ribbon around them.
Slightly smaller than the width of the ribbon to make a "bow" shape.

Glue the bows to the seams of the ribbons to cover them.

With the remaining wired ribbon, make a wrapped loop of ribbon and cut a length of ribbon for the "legs" of the bow.
Knot legs around the loop and fluff the sides of the bow out.
Use double stick tape to secure the bow to the top of the cake. I added the white accent ribbon to hide the knot and lined it with tape as well to hold it to the sides of the individual diaper it was sitting on.

Curl the legs of the ribbon and trim.

Now you see why I need a nap!